I worked with Brook on this project for the ECE 3140: Embedded Systems course. We were inspired by this video to come up with our own panel. The LEDs on the panel light up when a hand is waved over them, making for a very interesting display. Here's a video of the panel in action, courtesy of Brook:
The project report is below!
![]()
Introduction
This final project of the class is a design of interactive LED panel. The main project is to control the brightness of a single blue LED with a single photo transistor sensing circuit through MSP430 I/O ports. We then scale up the project and construct a panel of 72 LEDs and 18 photo transistor sensing circuit with two MSP430 target board. The basic project is able to light up an LED while the IR sensor is covered by hand and in the expanded panel, the LEDs are able to light up and dim down thereby tracing the hand motion over the panel.
System Diagram
Basic Project

Full Panel
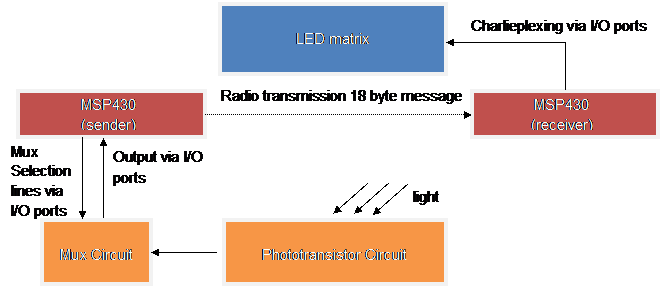
Panel Layout
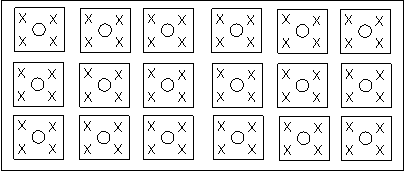
The circles represent phototransistors, and the crosses are LEDs. Each phototransistor provides the input that affects the four LEDs in the same box as it.
Hardware Description
Bill of Materials
Name |
Part Number |
Quantity |
Cost per Unit |
Total Cost |
Blue LED |
C4SMF-BJS-CR0U0452CT-ND |
72 |
$0.27 |
$19.44 |
IR Phototransistor |
475-1444-ND |
18 |
$0.38 |
$6.84 |
Foam Board |
1 |
$6.00 |
$6.00 |
|
Op Amp |
296-14587-1-ND |
9 |
$0.22 |
$1.98 |
47k Resistor |
S47KQCT-ND |
18 |
$0.08 |
$1.44 |
120k Resistor |
CF14JT120KCT-ND |
18 |
$0.05 |
$0.90 |
1M Resistor |
CFM14JT1M00 |
18 |
$0.08 |
$1.44 |
8.2M Resistor |
CF14JT8M20CT-ND |
18 |
$0.05 |
$0.90 |
0.33uF Capacitor |
FK24X7R1H334K |
18 |
$0.27 |
$4.86 |
16:1 Mux |
568-7817-5-ND |
1 |
$2.33 |
$2.33 |
4:1 Mux |
HCF4052BEY |
1 |
$0.62 |
$0.62 |
Total |
$46.75 |
Schematics
Charlieplexed LED Matrix (Input from Receiving MSP430)
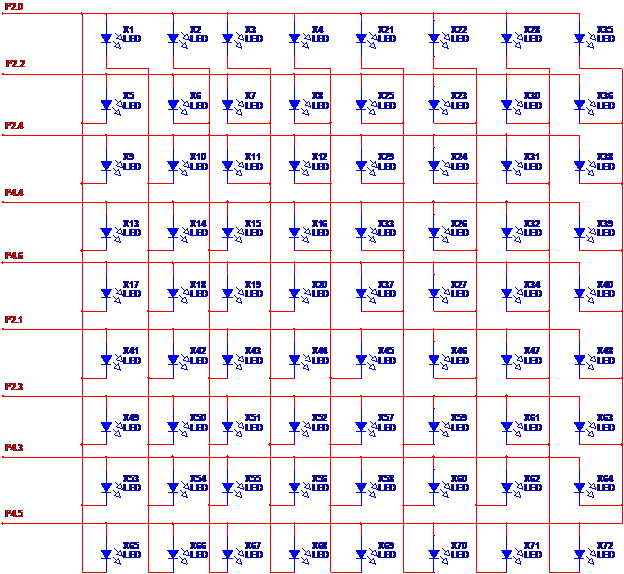
Charlieplexing allows each LED to be individually turned on using only 9 lines from the MSP430 by taking advantage of the high-impedance mode on IO ports. For example, to turn on LED 1, P2.0 is set to high, P2.2 is set to ground, and all the other pins are set to input mode, which presents high impedance to the circuit.
Phototransistor Sensing Circuit (Output to Mux Circuit)
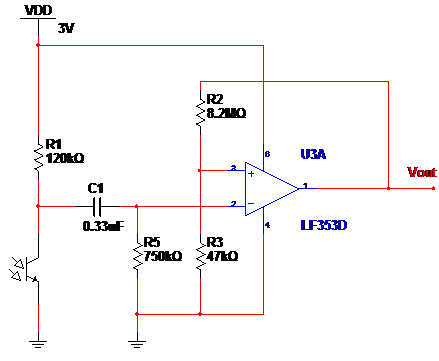
There are 18 of these cells in total, one for each phototransistor used. The schematic above reflects the connections for one cell, which outputs to the multiplexer in the next stage. The phototransistor is biased as a common emitter amplifier, and the biasing resistor value R1 is chosen to allow a voltage swing of around 0.5V in either direction at the collector terminal. The output at the collector is fed into a high-pass filter, which outputs to a Schmitt trigger (to control for noise variations). The threshold values for the Schmitt trigger are set to 0 and 17mV for the low and high thresholds respectively. Hence, when the phototransistor is covered, Vout will drop to 0v, and when it is uncovered Vout will rise to 3V.
Mux Input Select (Input from Sensing Circuit, Output to Sending MSP430)
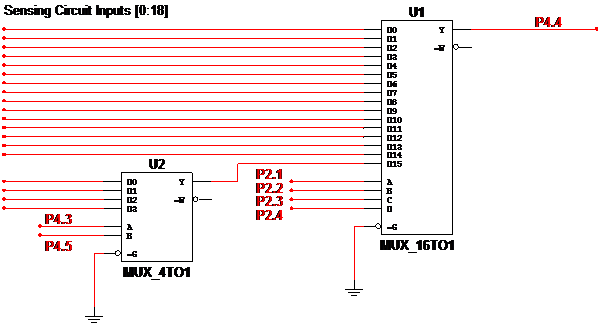
By setting the right values for P2.1, P2.2, P2.3, P2.4, P4.3 and P4.5, we can choose one out of the 18 inputs from the sensing circuit to appear at the output, which is fed to P4.4 of the same MSP430.
Detailed Software Description
Receiver (receive_app.c)
The receiver software keeps track of the status of LEDs by a global variable int LED_state[]. The main function executes control_LED(index, duration) and switches the LEDs on or off for a period of time according to the state recorded in the LED_state[] by checking the status of LED_state[] continuously. This variable is updated everytime by reading the message in the data packet in the interrupt service routine when a new data packet is received via radio.
Sender (send_app.c)
The sender software keeps track of the status of output from the mux output by a global variable mux_output[]via pulling. Each entry of the mux_output[] denotes the status of a photo transistor. The main method updates the mux_output[] by calling method read_Mux(). This function changes the high and low on 6 selection lines for the MUX. Then it reads and stores the output from the mux one at a time into mux_output[]. The main then executes set_Message() to decide which LEDs should light up or switch off based on mux_output[] and encode that into a 18 byte message (each bit represents a on/off state of a LED) stored in msg[]which will then be copied to the data packet and transmitted via radio.
Result and Testing
Basic Project
The testing of the basic project is simple as the result can be easily told by executing the full main method. The IR sensor circuit output is directly connected to an I/O port on MSP430 and the power line for the LED is connected to another I/O port on MSP430. Both LED and the IR sensor circuit share the same ground with the MSP430. When a hand covers the IR sensor (the IR sensor is in shadow), the LED lights up and when the hand moves away (the IR sensor is in light), the LED switches off.
Full Panel
Testing of the full panel of 72 LEDs and 18 IR phototransistor circuits and 2 MSP430s consists of several parts:
i. Charlieplexing test
This test simply checks whether the receiver is able to switch on or off any of the 72 LED correctly. In each loop iteraction, the main executes control_LED to toggle a different LED three times. All 72 LEDs can be toggled correctly in sequence. Therefore the test confirms the implementation of Charlieplexing is correct. In this test the radio transmission feature is disabled.
ii. Prototype test
This test is carried out in three phases:
The first phase involves checking the message content sent by the sender. To simplify the test, a single IR sensor is covered by hand constantly. Both sender and receiver MSP430 are installed with the full software. Therefore the information sent by the sender should remain constant throughout the execution. As expected, checking the message content in the debugger shows that the information contained in the message indeed shows that only one IR sensor is covered by hand and all 4 LEDs surrounding this IR sensor should light up. When the hand is removed, the message also changes accordingly showing that now LEDs should light up. This phase confirms that the receiver is able to update mux_output[] and encode message promptly.
The second phase fixes a particular message for the receiver which has the same content as the correct message that the sender is supposed to send. This can be visually checked by observing the LEDs on the panel. As expected, the LEDs light up on the panel are only the 4 LEDs surrounding the particular IR sensor. This phase confirms that the decoding of message is correct.
The third phase involves integrating the receiver and sender with radio communication. As expected the red LEDs on both MSP430 boards blink indicating the message is continuously being sent and received. And the 4 LEDs surrounding the particular IR sensor are able to switch on and off accordingly.
This test on a whole confirms that the radio transmission is able to promptly update the receiver and the message encoding/decoding function is correct.
iii. Hardware test
Before carrying out test i) and ii), hardware tests on all 18 phototransistor circuit, the mux input circuit and charlieplexing connections are carried out first. These tests are relatively easy as they don’t require software installation and the result can be easily observed by probing the output voltage.
Summary
Each subsystem, on its own, was relatively straightforward to design and implement. The chief difficulty is during the integration of subsystems, since many errors would come up when the subsystems tried to interface with each other. The difficulty of debugging arises because we have an abundant connections and circuits and source of errors could lie in both hardware and software. Therefore we have to exhaust the error sources in debugging. However, we have minimized the difficulty by designing a prototype test and make sure that all 18 circuits and Charlieplexing are scalable. Therefore error sources are most identical in each circuit. In testing the mux circuit, we also encountered the problem with dynamic nodes and came up with a solution to avoid it during testing.
Through this process, we gained a better appreciation for the working mechanism of Charlieplexing, op-amp biasing in a Schmitt trigger circuit, and cascaded multiplexers. We also learned to build a large-scale and robust real-time embedded system. It was fun.
Code Files
Charlieplexing Files (charlie.c, charlie.h, charlie_test.c)
Wireless Communication (receive_app.c, send_app.c)